

WATCH 5-MINUTE EXPLAINER
So excited that we are embarking on our journey along the Nile, through Stephanie’s artistic interpretation of modern Egyptian music and dance!
Information for Prospective Soloists
Please Read Carefully:
-
"Gift of the Nile" will bring the beauty of belly dance to the broader public, and I'm excited to invite you to the soloist audition process!
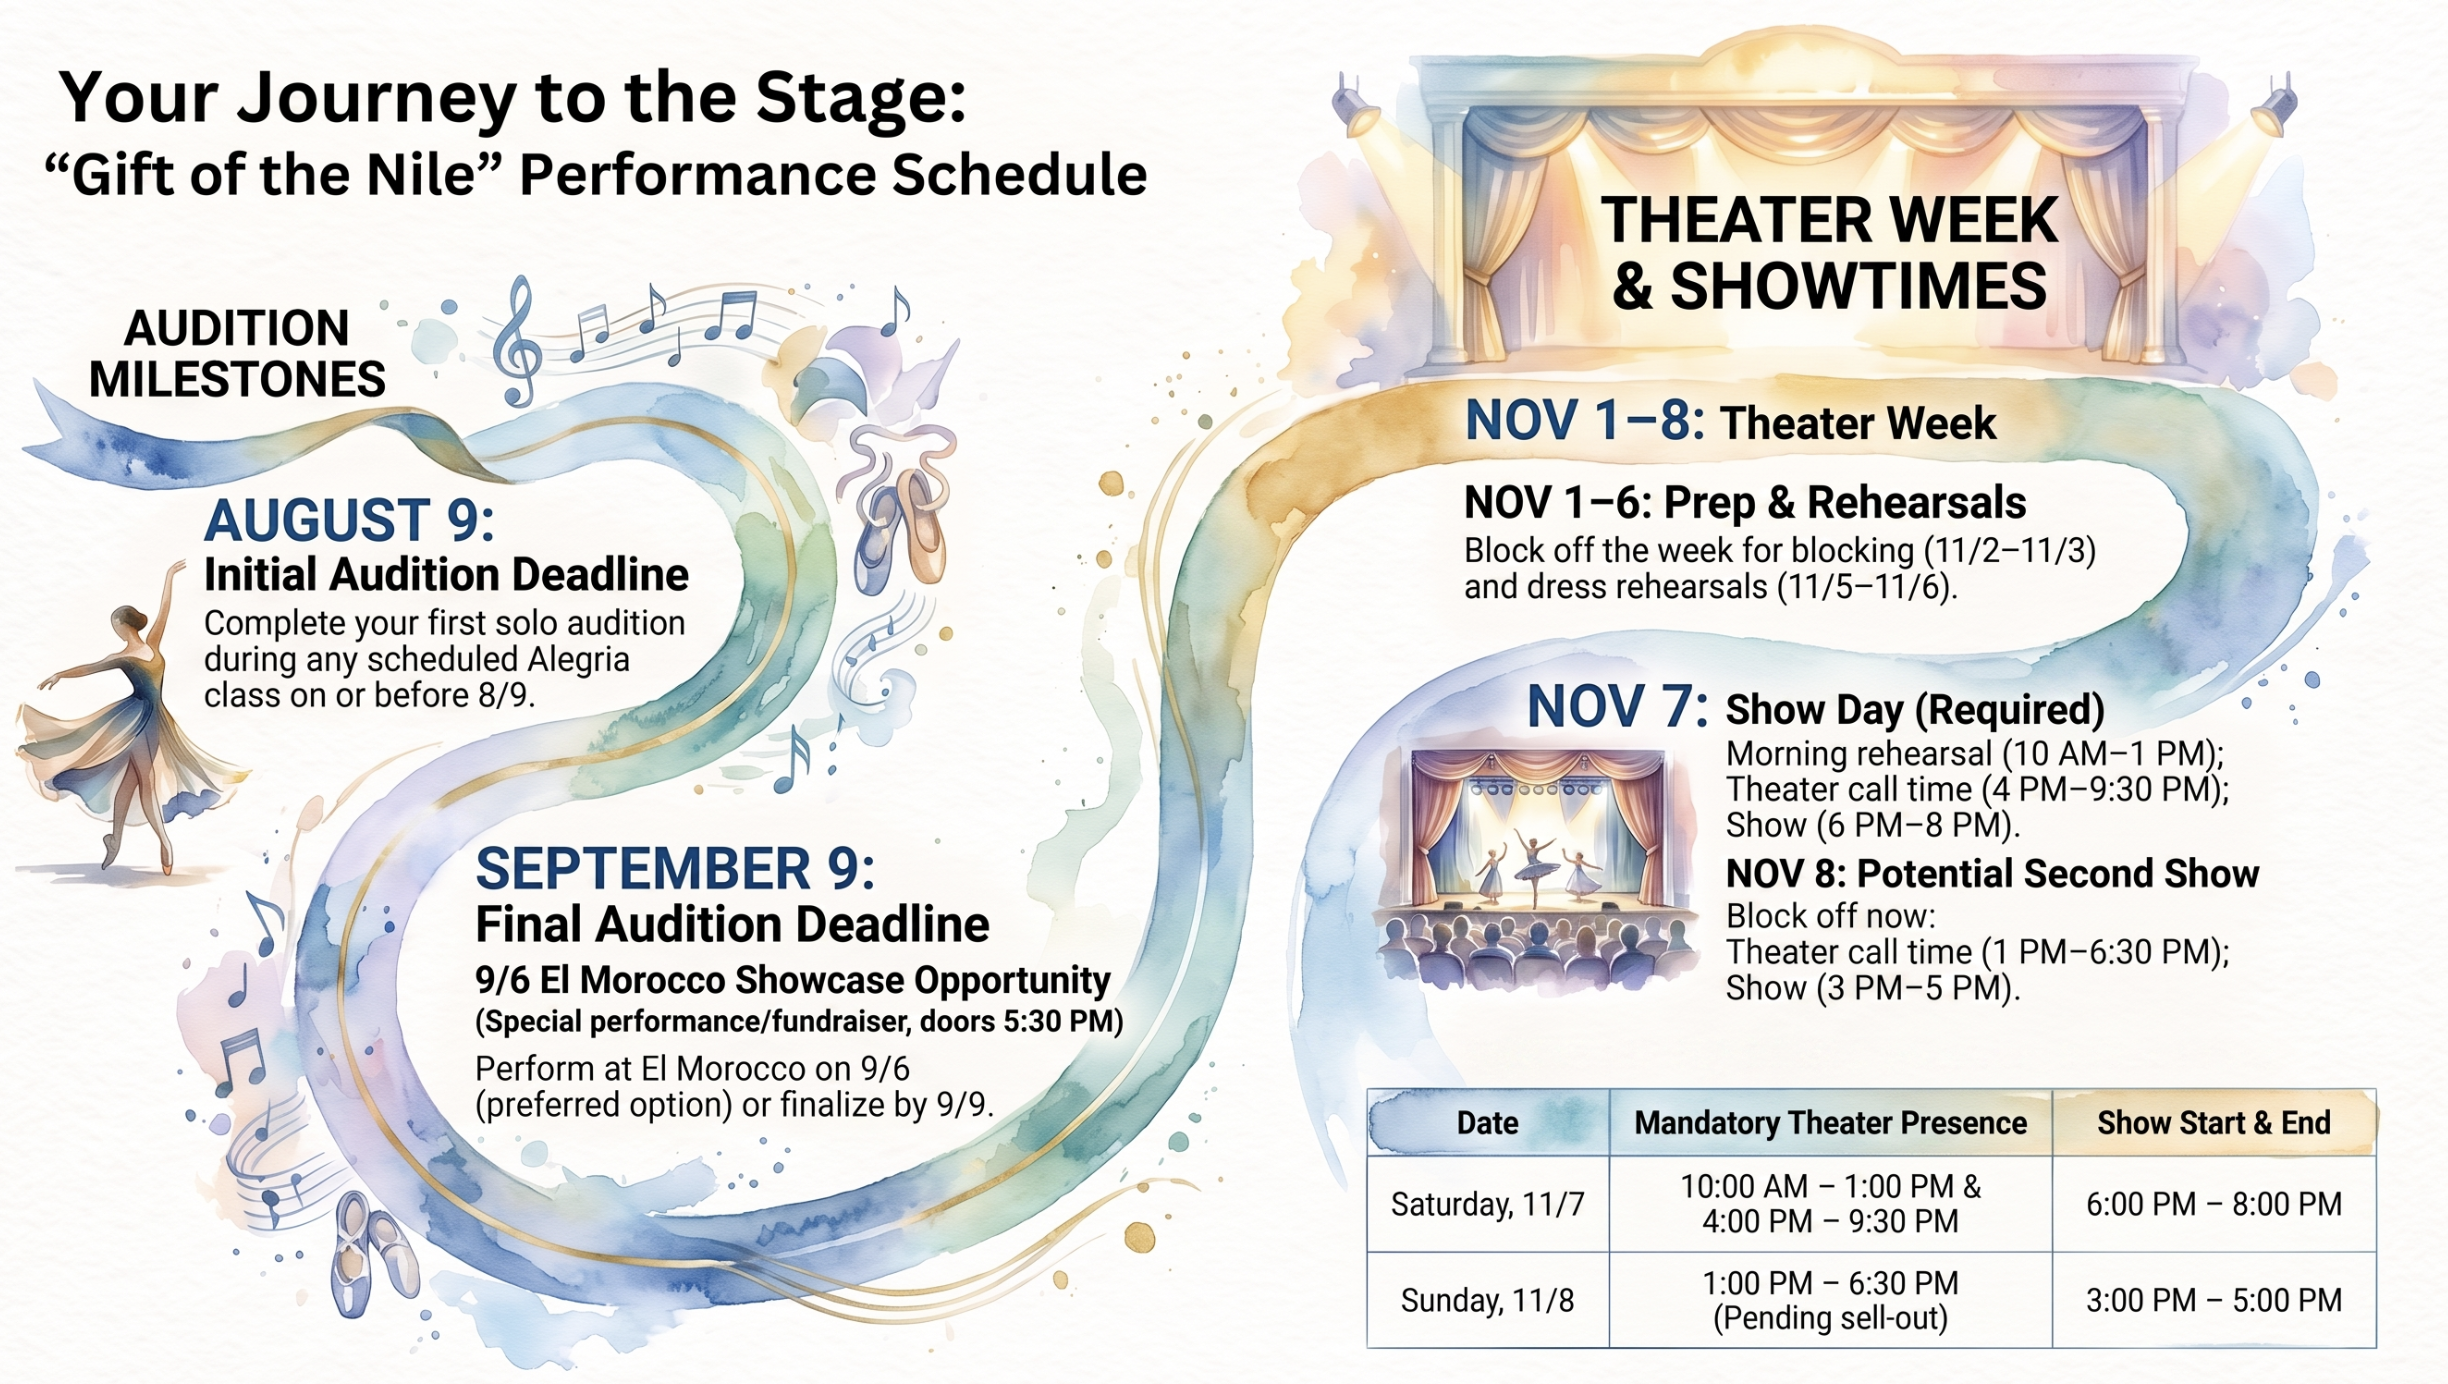
Here is the general timeline of the audition process. If you miss any of the deadlines without informing me and making alternative plans with my sign-off, your spot in the auditions will unfortunately be relinquished.
Once you choose your specific audition dates, please inform me so that I can prepare.
Step 1: August Initial Audition
Due anytime on or before 8/9.
You can audition during any class I teach at Alegria (Mondays 7pm and 8pm, Tuesdays 7pm, 2nd Sundays 2-4pm, 4th Saturdays 6-8pm).
If you have never before taken a class at Alegria, you will first need to fill out the registration form (either paper or online).
Step 2: September Final Audition
Due anytime on or before 9/9.
If you can’t make El Morocco on 9/6 (see below), you must initiate discussion with me ASAP to discuss alternatives. This audition is more complicated and will require more planning.
Your second audition must include: 1) full costume, 2) your choreography performed start to finish with the final cut of music, and 3) strangers in the audience.
At least a few strangers are required because we’re getting closer to performing in front of a theater mostly comprised of strangers!
You’re strongly encouraged to audition on 9/6 at El Morocco in Pleasant Hill. Dinner seating is 5:30pm.
This is a beautiful restaurant that harkens to yesteryear (very few still exist today), and is usually inaccessible to us. So it's a rare opportunity and, as I think you'll find, a memorable one!
Invite friends and family! They will be able to cheer you on, be dazzled by belly dancing from multiple performers, and enjoy the ambiance of a beautiful themed restaurant with authentic food.
Dinner reservations are required since the restaurant is small, and seats near the dance floor are very limited.
Please call the restaurant yourself at 925-349-9313 with your headcount as soon as possible. Mention that you're one of Stephanie's performing students, which may help get your table closer to the floor. I'll be opening reservations in the next few days.
Cost:
Cover charge $15/person. Your guests will get to enjoy a fabulous evening of belly dancing by both students & pros! Proceeds benefit "Gift of the Nile" — please ask your guests to pay me in advance to minimize same-day chaos.
Dinner, $30 minimum/person: full menu is $55/person (multiple courses); mini-menu is $30/person (1 entrée or 3 appetizers — soup, salad, b'stilla).
Performers (that’s you) do not need to pay the cover charge, and only pay for dinner if they're eating at El Morocco.
Music Cuts
Your music for the showcase needs to be fully edited, with no starting and stopping.
Simple straight cut? Try Audacity for free (skip past the main yellow button and click the "Download Audacity without MuseHub" link to avoid unnecessary cloud storage, which I believe costs money). Or, I might be able to help if you email me the MP3 that you'll likely need to purchase on iTunes or something similar. STREAMING SERVICES (like Spotify) WILL NOT WORK. Those files cannot be edited, plus all DJs need the file itself.
More complex? Ask Xavier (~$35/file). Be specific on your cut points and give him at least 2 weeks.
Step 3: Theater Week
Please block off 11/1–11/8 for rehearsals and shows at the Denair Gaslight Theater. The rehearsal timings are tentative, but we're definitely going to have them. These include:
Blocking on stage: I'd like to have our regular class at the Gaslight on Monday 11/2 and Tuesday 11/3 so that we familiarize ourselves with the space; I'll try to get more time if I can. Of course, I'm beholden to the theater's availability.
Dress & Tech rehearsal: probably 11/5 and/or 11/6.
SHOW TIMES
11/7 show: set aside time for a final rehearsal in the morning (maybe 10am–1pm). Plan to be at the theater 4–9:30pm for the 6–8pm show.
11/8 show, if we sell out 11/7: please block off now because we won't know the situation until much closer. Plan to be at the theater 1–6:30pm for the 3–5pm show.
Please plan to stay and help us clean the theater after the show. Many hands make light work, and we want to be respectful of the beautiful space that we will be performing in.
Timings for Theater Week rehearsals might change because I still need to coordinate with the theater. That said, I wanted to give you a general idea for now so that you can block off your calendar.
Thank you so much for your enthusiasm and talent. I cannot wait to see you shine and to help you progress in your development as a dancer and as a beautiful human being with so much to share. Let me know if you have any questions!
Last updated 8/8/26.
-
Please submit the Performer Data form ASAP. Deadline to submit is September 15, but I’d love to see your info as soon as you’re ready to send it in!
-
We’re working hard on the show’s sequencing (acts in order)! Note that the sequencing will be in flux until explicitly denoted as final at the top of the document.
Click here.
Request access.
Check your e-mail for notification when I grant access.
-
All confirmed performers will be required to submit the Performer Data form by September 15.
Brows & Eyes
"Gift of the Nile" — Performer Makeup Guide
Simple, Step-by-Step Instructions for Everyone in the Cast
This guide is written for beginners — no makeup experience needed. Follow the steps in order and you'll get the show's signature look every time.
The Look
Everyone in the cast wears the same core look:
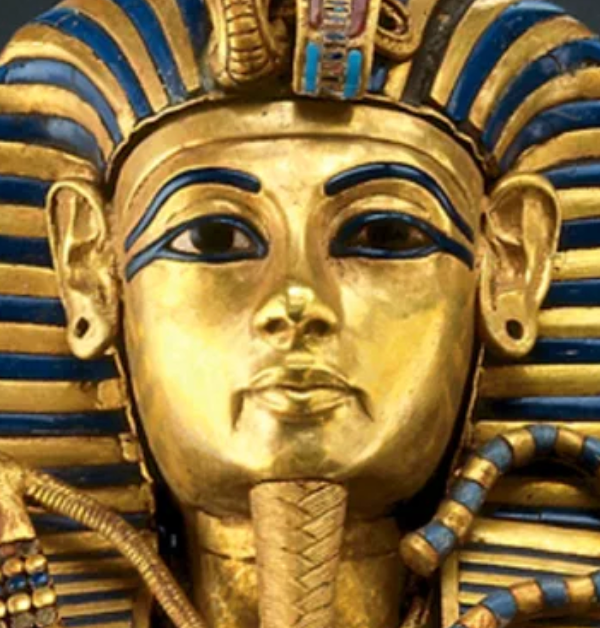
Eyes: thick black eyeliner on the top AND bottom lid, extended longer than a normal wing — straight out toward your eyebrow, like the painted eyes on King Tut's funerary mask.
Eyebrows: extended long and straight so they run parallel to that long eyeliner line.
Eyeshadow: dark brown + gold. (Only Stephanie wears the bright green eyeshadow — everyone else uses brown.)
Cheeks: blush in the reddest shade available.
Highlight: light gold, on the high points of the face.
Lips: classic red.
That's the whole look. Nine simple steps below.
The 9 Steps
Step 1 — Base Apply your normal foundation. If using bronzer, warm up your whole face and neck 1-2 shades. Set with powder (item 4).
Step 2 — Eyeshadow Sweep the dark brown shade over your whole eyelid, from lash line to crease, in one flat layer — don't worry about blending it perfectly, a solid block of color reads better from the stage than a soft gradient. Then pat the gold shade into the center of the lid and up toward the brow bone. (Stephanie: use the green shade the same way instead of brown.)
Step 3 — Top eyeliner (the signature line) Using the black cream liner and angled brush, draw a thick line along your upper lash line. As you reach the outer corner, keep going in a straight line out toward your eyebrow — longer than a typical wing. Think of the long, straight painted eye on King Tut's mask, not a curved cat-eye flick.
Step 4 — Bottom eyeliner Draw the same thick black line along your lower lash line, connecting it to the long line from Step 3, so your whole eye is outlined in one continuous shape.
Step 5 — Lashes Line your lower inner waterline with the white pen (keeps your eyes visible under the heavy black liner). Apply false lashes and one coat of mascara.
Step 6 — Blush Apply the red blush to the apples of your cheeks and blend up toward your temples. Use more than feels natural — it needs to read from the back row.
Step 7 — Highlight Dab the gold highlighter on your cheekbones, the bridge of your nose, and your brow bone — the same high points light would naturally hit.
Step 8 — Brows + lips Use the black liner (or a spare angled brush with the same product) to extend your eyebrows into a long, straight line that runs parallel to your Step 3 eyeliner line — this is what ties the whole face together. Finish with the red lipstick.
Step 9 — Set and check Dust everything with translucent powder one more time. Step back 10-15 feet, or check under real lighting, to make sure the look reads clearly from a distance.
Fast Troubleshooting
Liner won't stay put: pat translucent powder over it right after applying, before it fully sets.
Your extended liner line looks uneven side to side: hold your brush against your brow/temple as a straight edge before committing to the line.
Colors look washed out under lights: add a second layer of brown before adding more gold — gold should be a light-catching accent, not the base color.
Running out of time before curtain: prioritize Steps 3, 4, and 6 (the long liner + red blush) — this is what reads from the audience even if everything else gets simplified.
Testing under stage lights during tech rehearsal is important because lights can wash out shadow and shift how the red and gold read.
Amazon Links
| # | Item | Amazon Link | ~Price | What it's for |
|---|---|---|---|---|
| 1 | Black cream eyeliner | e.l.f. Cream Eyeliner, Black | $5 | The signature long liner (Steps 3-4) |
| 2 | Angled liner brush | e.l.f. Angled Eyeliner Brush | $4 | Applying the liner precisely |
| 3 | Dark brown + gold eyeshadow | e.l.f. Bite-Size Eyeshadow, "Truffles" | $3 | Lid color, Step 2 |
| 4 | Setting powder | e.l.f. Halo Glow Soft Focus Setting Powder | $8 | Locks everything in under stage lights |
| 5 | White waterline pen | e.l.f. H2O Proof Inkwell Eyeliner Pen, "White Out" | $6 | Keeps eyes from disappearing under the heavy liner |
| 6 | False lashes + glue | e.l.f. Winged & Polished Luxe Lash Kit | $6 | Step 5 |
| 7 | Mascara | e.l.f. Big Mood Mascara, Black | $6 | Step 5 |
| 8 | Red blush | e.l.f. Sheer For It Blush Tint, "Left On Red" | $8 | Step 6 (also works as a backup lip color) |
| 9 | Gold highlighter | e.l.f. Halo Glow Highlight Beauty Wand, "Liquid Gold" | $10 | Step 7 |
| 10 | Red lipstick | e.l.f. Matte Lip Color, "Rich Red" | $3 | Step 8 |
| 11 | Bronzer (optional) | e.l.f. SKIN Bronzing Drops, "Pure Gold" | $14 | Warm base under everything, Step 1 |
| 12 | Makeup remover cloths | e.l.f. Makeup Remover Cleansing Cloths | $6 | Strike, after the show |